Posted on 1 Comment

Beanpole Teepee and Patio

The beanpole teepee for the boys is DONE! I spent way too much time digging the sod out. I wanted to rent a sod cutter but it was not worth the cost. $65 for 4 hours, when the rest of the project only cost me around $60.

I of course got my idea from a pin on Pinterest. I pretty much followed the directions on the page except for the center stone. They wanted me to get a 17″ stone. Well, they don’t come in that size. At least not that I could find after spending a couple of hours searching online. I considered making my own using a plastic planter base as a mold but then I realized it would take a good week to set and become useable. That was not going to work for me. I wanted to get this project done right away.

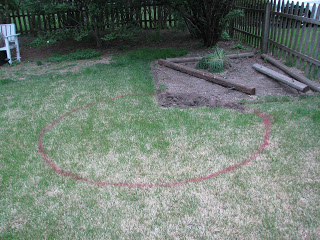
First, I took a stick and tied a 3.5 foot piece of twine on it, near the bottom, then I stuck it in the ground where I wanted the patio floor of the teepee. I took a left over can of spray paint from the crib project and sprayed the grass while  holding the nozzle of the can near the end of the twine and walking in a circle.

Next, I started digging (about a foot outside the pink line, the pink line is the finished size of the patio….I wanted a dirt area on the outside of the patio to have a space to plant the beans in). I have no idea what kind of grass this is here in the back of our yard. It is different from the rest of the yard. It goes completely white in the winter (it has not yet gone completely green yet this year) and it is thick. It’s root system makes a sort of mat in the top 2 inches of the soil. It about killed me to even get the shovel though the grass. This step took me 3 days when it should have only take me a few hours. After I had about 2/3 of it done I got G to help. I had planned a play date with a couple of kids from Hugh’s school but they only planned on helping with the bricks.

There was the problem of what to do with all the grass and dirt that I ripped out. Well, I made some new flower beds with it! I put down newspaper to smother the grass in the area and then I put the sod upside down on top of it. By putting it upside down the sun bakes the roots and the grass stops growing. I will spend the rest of the summer adding to the new beds. G will dump all the grass clippings on it and all our kitchen compost scraps will also go on it. If I had all that stuff to dump on it now I could just let it sit for 6 weeks and it would be ready. I have to do it the long way though. It will be ready to plant in in the fall.

Here is the final size of the newly added bed. I was excited to be able to get the entire bed laid out with the sod and dirt that I ripped out of the patio area!

Next up…the sand base. The pin directions called for 12 bags total, 6 for the base. Yeah, as if. I had to use all 12 bags as the base. This pic is of the awesome mom from the boys’ school and G working on leveling the sand. I have to say, this was the hardest part and the part that we kind of gave up on. I knew that a perfectly level patio didn’t matter since it’s intended purpose is the floor of a teepee. I learned a lot though and I “think” I will be able to accomplish this step a bit better on the big patio on the other side of the yard (the one that we intend to put a table on and need a level floor).
Oh, and I know it is just an excuse but it was HOT out. Hot and the sun was beating down on us (I have the crazy sun burn to show for this day), and we needed this step to be over.
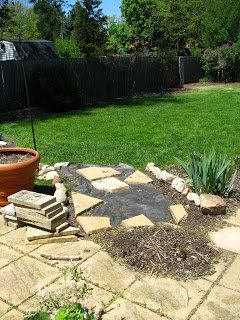
I didn’t get a picture of the step where we laid the bricks. Or the kids hauling all 150 bricks and handing them to me but I did get this one of the boys standing on the patio before I filled in the cracks. You can see that it is not level…I was not about to pull the bricks back up and start over with the sand step though. I also bought a bag of smooth river rocks and we added them in the “big cracks”. It think the kids enjoyed doing that.
I decided to add a stepping stone where the “entrance” to the teepee would be. I also decided to not use regular sand to fill the cracks. That is just inviting 2 young boys to dig it all back up. Doing that turned into a huge hassle though. I did my research and decided to use polymeric sand It worked perfectly and almost like magic! I love that stuff. I ended up having to use two 50 lb. bags…and that was exactly enough for a patio of this size. 
We had a frantic gardening in the dark issue with this though. I spread the sand and then got it a little bit wet with the hose…it got dark by this point….the directions said to go out and get it wet a second time…I did that. The directions then said to not let it get rained on for 24 hours. Go, check the weather. Oh, crap! Realize that it is supposed to storm all night and all the next day. Then realize that the tarp is still holding all the dirt that needs to be back filled around the edges.
G really is a good sport with all my crazy projects. He came out and set up a small flashlight and started back filling the dirt while I finished up something in the house. I came out and we finished with the dirt. It actually was pretty nice working in the garden in the dark. No chance of getting a sun burn! Anyway, after all that work to use the tarp to cover the patio, the storms all passed us by. I shot this pic the next evening just before dark. You can see my stepping stone where the entrance  will be.
G had a day off work today so I got him to help me with the poles for the teepee. I bought twenty-four 6′ bamboo poles. I knew that they would not be long enough since the patio is 7 feet across, so we taped 2 poles together with some duct tape. We gave them a 12″ overlap to make them sturdy. That gave us 12 poles for the teepee. Miss Faye was great and took a nice long nap so we were able to get the entire thing done. I didn’t measure but I think there is a good 7 or 8 feet of standing room on the inside of the teepee.

As for the top of the teepee, I just tied the bamboo poles together with twine.

We left to go pick the boys up at school and came back late in the day. The sun was low in the sky and I realized that my stepping stone and entrance were poorly located. They face west and the afternoon sun shone directly in the teepee. Obviously it is not an issue now that it is bare, but once the beans fill it all in then it will not be shaded inside in the afternoon. It bothered me enough that I dug the stone up and relocated it on the south side of the teepee.
After I relocated the stepping stone I then needed to fix the position of all the bamboo poles to accommodate a new entrance. Then, give the boys a quick planting lesson. Find stick….poke holes around poles…drop a couple of beans in each hole….cover and firm soil….DONE!

Then I tied twine all around the teepee to define the area for the boys (get them used to going in and out at the entrance) and to give a tiny bit of stability to the poles.

Here are the boys….excited by the teepee. Well, Hugh is for sure and Owen is really excited by the rolly polly in Hugh’s hand.

Now, we water and wait. We planted 6 beans around each pole. There has got to be at least one good strong one to come up around each pole. I will thin them back if we get all of them to come up.

Project done! On to birthday party planning. The count down is on….party in 11 days.

Posted on

My Summer Gardening Plans!

Every year I try to do more landscaping in my yard. I really enjoy the manual labor and I love to make my yard beautiful. I wish I could do more each year but sadly the budget only allows a little bit. This year I am enlarging some flower beds, completely changing my garden to accomidate a teepee for the kids, and creating a path to “enter” the yard while surrounding the patio with flower beds. 
I have already started on the path. I was initially only going to put a narrow stepping stone kind of path in but then I realized we needed to be able to get the lawn mower into the yard without crushing the flower beds. So, a big wide path it has become!
Mini path progress (it will be solid stone when I’m done). This is just a dry lay to see if I like it. Now I need to go get some sand. Except for the sand (which is only $1.50 a bag) this is a free project….the last people who lived here put in the patio and kept all the extra stones in a big pile behind the garage. It is kind of nice to get rid of the piles! I don’t want the pavers perfect squares like they are now though so I need to figure out how to break them.

View of the path from the yard looking at the house. I will rip out all the grass to the right of the path and make that flower bed butt up to the path.

I got a couple of plants today. One is a vivid pink hollyhock….I will plant it near my bean teepee. The other is a dappled flamingo willow. I still have to figure out where I want to put it. I researched it online and it is supposed to get HUGE and grow fast. I may put it in the bottom right of the below picture.

If you look closely you can see my pink circle in the grass. I started making the flower beds around it it two years ago. I will clean it up and make the flowerbeds go all the way around (except for an “entrance”) this summer. Next summer I plan on digging out the center and putting in a patio for our bistro set…..can’t afford all the stones this year though. If I do put the dappled willow near this “almost” patio it will be in a perfect position to block the patio from the neighbor’s prying eyes.

Finally, the “fun” project! Over in this corner of my yard I had my “garden” it was tiny, but you can see another pink circle. This one is where I need to rip the grass out right now. I’m putting in a very small brick patio which will be the floor of my bean teepee. Then I will create new garden beds around the outside of the teepee area. I still need to mark those before I rent the sod cutter.

Off to start digging!

Posted on 1 Comment

Paleo Kids Day 2

I have been eating primal/paleo since September 2011. We stick to it for the most part with some indulging. I never switched the kids to this style of eating because I didn’t really have the energy. I know that is a totally lame reason but there you have it.

Well, Owen has been “sick” since before Christmas. We thought it was a cold at first. One that just never went away. He never had a fever and just always would sniff his nose. It was never really drippy enough to even bother with blowing it. Recently he has started to clear his throat a lot. He was starting to sound like an old man. I finally broke down and took him to the doctor to see what was up. Turns out he has some allergy signs. Massive post nasal drip being the big one. Our doc is awesome and she gave us some all natural chewable pills to help him out. Well, he totally hates them and fights us crying every time we try to get him to take them. So, I start doing some research.

I know that grains/gluten are not good for our bodies and I also know that dairy can really be bad. The dairy causing extra mucous and the grains/gluten causing inflammation can either trigger allergies or mimic them. So, we made the decision to put the entire house on a strict paleo eating plan (oh, and we figured out about a month ago that Miss Faye cannot tolerate dairy or eggs in my diet…crazy skin issues), no grains, no chemicals, no dairy, as much all natural and fresh foods as possible; total clean eating.  Plus, I would rather change how we eat and correct the problem than to start constantly drugging my 3 year old. There are times when drugs are appropriate, I do not feel that this is one of those times. Owen is also getting some apple cider vinegar every day (that stuff is just awesome).

I started out by telling the boys that we were doing this. I gave them a week’s notice. We talked about it every day. How some of the foods we were eating were causing Owen to not feel that well. We told them what they will no longer be able to eat and we gave them a huge list of what they WOULD be able to eat. I made sure to talk with the school so they could encourage the boys while they were there.

We are on day two, and so far it is going great (I’m knocking on every piece of wood I can get my hands on here). Breakfast is the hardest for the boys. They were used to getting up and having cereal or a fruit bar on their own. I’m having to direct them to the copious amounts of fruit and veggies that are now in our house; as their go to “fast foods”.

Tonight for dinner I made a simple dinner of chicken, carrots, and spinach. The chicken was just cooked on the stove top with some seasoning and about 1T of bacon drippings. The carrots were just boiled then had a bit of salt and garlic added (I know this is like the worst way to make carrots. I usually like to roast them but just didn’t have the time…I am doing the single parent thing tonight while G is out of town for work). The spinach was cooked as if it were creamed spinach but I used chicken stock in place of cream. I thicken it with almond flour.

The boys were not fans of the spinach (I was though…it was awesome),but loved the chicken and carrots (full disclaimer here on the chicken…Hugh HATES meat. The fact that he ate 5 bites of it without complaining and then asking if we can have it again tomorrow night for dinner just about blew me away. Our policy for eating is that the boys have to have one “no thank you” bite. After all, how can you say no thank you if you have not tried it to see if you even like it. They also have to have that one no thank you bite every single time a food is put in front of them. They also do not get something else in place of that food, if they are still hungry then they must eat what is on the plate).

So, without further ado…THE picture (I so want a better camera)!

Posted on

A Laundry Schedule

Everyone hates laundry. I know of no one that enjoys it. Yet, it has to be done….and there is a LOT of laundry for a family of 5. Sheets, towels, baby socks, rags (we don’t use paper towels here, only cloth), kid’s clothing with only one a small difference in size….well, you get the picture. It is a lot of laundry that is not that fun to sort. We kept getting to the point of drowning with all of the folding. No one wanted to fold because it was so difficult to sort at the same time (well, really only Greg did the laundry before. He always gets mad that I say we when it is only him doing something), plus the space needed to have all the folded piles was immense. Think about taking all the clothing for 5 people and washing it by sorting darks from whites….now imagine folding it all. 5 piles for underwear, 5 piles for socks, 5 piles for pants, etc. Needless to say that method is the wrong one with so many people…oh, yeah….and having to check the tags for all the kid pants and shirts to know which pile to put it in just added more to the fun factor.

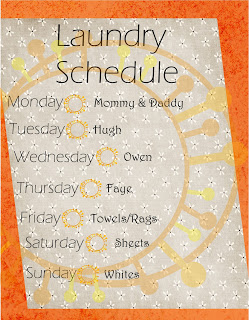
I started checking out all the pinterest laundry pins I could find. Then I started googling it. I decided that we would just give up clothing and become nudists start assigning each person a laundry day. We hit the store and got a couple more baskets and now each person in our house has their own. Not only that, but the cloth diapers, and towels, and sheets each have their own baskets as well.

Every two to three days I have to do a load of diapers.

This is working out really well for us. Each person puts their dirty clothes in “their” basket and on their laundry day they bring their basket to the living room. I get it washed and folded and back in the basket by the end of the day (let’s be honest here….rarely does it actually get folded that day, but it does get cleaned and dried that day). Each person is then responsible for putting their clothes away (well, except Faye). When the folding does happen it is much easier to just grab a basket and fold that one person’s things and put it back in the basket.

Now what I want to do is to build one of the basket towers that I keep finding on Pinterest, like this one…

If anyone has any wonderful tips on getting a magic fairy into the house to fold all this laundry that would be great..