Posted on

Halloween Costumes

I know, I know…this post is coming a bit late. I have been both busy and a slacker.

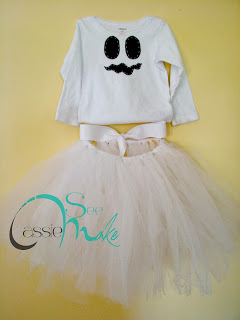
This year I mainly focused on Miss Faye’s costume. Owen decided to go as Superman…which Hugh had done a couple of years ago so we already had that one. Hugh decided to go as Wolverine, but not the cartoon Wolverine, the movie Wolverine. So, I hit the store and bought him a muscle shirt and the claws. Easy and done. For Miss Faye, I decided to make her a ghost. I kept seeing the tutu ghost costumes all over and I knew that would be easy and adorable so that is what I did.

The tutu skirt was easy. I just bought 2 yards of tulle and cut it into strips. I know you can buy it in the 6 inch roll but it cost more that way. The strips were just looped around a piece of ribbon. Easy and done.

 If you look closely you can see sparkles. I did splurge on one roll of glitter white tulle. I only put a few pieces in the skirt as it was really stiff and scratchy.

 For the top, I used a long sleeved white onsie that we already had in Faye’s drawers. I added eyes and a mouth out of black scraps from my stash.

 I put a quick and easy running stitch around the edges in white to make it stand out.

 Here I am with Miss Faye in her costume. I didn’t get very many pictures that day. I’m thinking I will dress her back up to get some better pictures. As you can see I made myself up with a sugar skull. If it had not been raining and gross I would have attempted fun clothes to finish the look.

….and here we all are, heading out to trick or treat in the rain. Don’t mind that Owen does not have red bottoms on. I had them but we could not find them anywhere.

ETA…I took some pictures of Faye in her costume. She moves around so much that these were the best I could get.

Posted on

An Organized Workspace

I keep accumulating more things ribbons, fabrics, books, thread, yarn, etc… and I have such a small workspace/sewing area that it was beginning to be so cluttered. I would have to move a pile out of the way to cut out fabric. Then, I would move the pile out of the way to get to one sewing machine, then the other. And on and on and on. I was drowning in sewing supplies. Yet…. you can never have too many supplies. What I needed was to utilize the wall. Shelves would need to go up. I found some awesome floating shelves….crazy expensive is what they were. Part of the reason I have taken up sewing so much is to save money. So, I hit up our local hardware store and picked up some cheap particle board shelves with some brackets. I even splurged an extra $2 and got two brackets that would hold a dowel rod for my ribbons!

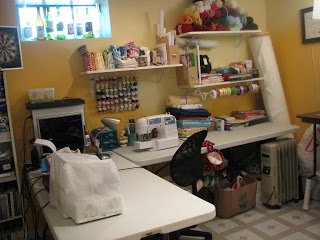
Here is my little corner of the basement/playroom. I still have boxes and bins full of fabric and old clothes to cut up for fabric under all the tables. I’m also thinking of getting one more shelf.

See my window….no I really don’t drink that much.

The other side of my little corner. More bins and boxes of fabric under my cutting table. The containers on the wooden desk are all different colored snaps. Another window full of wine bottles. I swear I don’t drink that much. I keep collecting them to paint though!

Here is my stash of yarn. I need to figure out a better way to keep it all up on the shelf. Maybe some wire bins turned on their sides? I will keep trolling pinterest for some ideas.

Here are my sewing books and the awesome hand spun wool I got from the farmer’s market.

Here are my useable fabrics and scraps and my thread. On the right I used a magazine holder to put my patterns….it is stuffed pretty full right now so I need to come up with a different solution for that.
 I also left space for another thread holder. I have the thread to fill it but need the money and the time for another trip to the store.

Here is my cutting table with my planning bulletin board over it…right now it is covered with patterns I need to put away. The table is just a standard 4 foot folding table that was raised up by using some PVC pipes (I forgot to take a picture of that but you can sort of see them in the top picture)

Here is my dowel rod ribbon holder. Only room for a little bit more ribbon so I will need to figure out more storage space for more ribbons soon. I will wait until that point comes to think about  it though. To the right of the shelf you can see my crazy huge roll of fleece. I also have miscellaneous supplies on this shelf; paper crafts, elastics, bias tape, lace, glues and interfacing.
 Now I have until Saturday to sew a birthday dress for Miss Faye! It is nice to have room for all the sewing!

Posted on

The Ice Cream Dress

 This was my first go at an Oliver + S pattern…well a paid for one anyway. I am very fond of the Lazy Days Skirt, free pattern on their site. 
My niece is getting married so Miss Faye needed a party dress. I already had the material…a pale yellow broadcloth from Hobby Lobby and a pair of white eyelet pajama pants from the back of my drawer; they just never fit quite right….so I was on the lookout for a pattern. Gail from over at Probably Actually just made another Ice Cream top and I knew that the dress version would be perfect for what I had in mind.
The pattern was easy to follow. They give great tip for making each step a bit easier. Overall, I’m totally in love with the dress I made! I made the 12-18 month size which turned out to be way too long…but fit great everywhere else. I kept all the extra material and just folded it into the hem. This way, as long as the head and sleeves still fit; I have 4 inches I can let the dress out at the bottom. I also modified the dress as well. I wanted the eyelet as an overlay and the pattern called for color blocking. The color blocking just was not what I had in mind for a party dress. I also didn’t add the pockets or the ‘v’ notch that should have been on the collar. I also added some ribbon on the bottom to sort of mimic the color blocking.
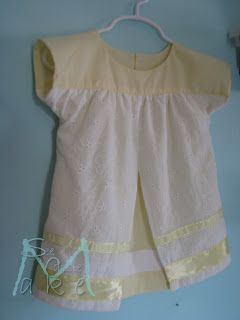
Here is the completed dress (well, maybe not…I think I want to add something up near the top).
  
I created the split by folding the eyelet in half after I already cut out the pattern piece. I marked in 2.5 inches (knowing that would double when I unfolded the dress) and around 12 inches up. I cut out the ‘V’ shape that I had created and then I unfolded the dress and continued cutting the front piece in half. I put in a 1/4″ hem going down each side and then I used my surger to sew the two halves back together.
I made the main part of the dress out of a pale yellow material that I picked up at Hobby Lobby. It was one of those purchases just because I loved the color. It was also only a $2 purchase…I mean, how could you pass something like that up! I just knew I would find a reason to use it.

I also picked out a fun button with the help of Miss Faye’s big brothers.

She looks adorable in the dress! As you can see, I added white ribbon on the yellow fabric and yellow ribbon on the eyelet. I choose three different ribbons to add some visual interest.

And someday my 11 month old will get some hair!

ETA….I did add some daisies! This dress is just perfect!

Posted on

A stress busting skirt!

I have been slack in the blog department. I have been keeping very busy though! I had a joint birthday party for the boys, I made a dress for Miss Faye, and we had an awesome camping trip. I will get posts up for all of those things soon!

For now, I made yet another Lazy Days Skirt for Miss Faye. The quick and easy aspect of the skirt makes me feel like I have accomplished something. Even if it only took me around 35 minutes to make. I have so many other projects that are huge time and energy eaters that ‘accomplishing’ something makes me feel like I’m out of the project rut.

Some of the projects that I’m working on…..

  • A set of cocktail sized napkins for a Montessori classroom (I’m actually almost finished with these).
  • A guest blog post for a good friend (not hard but I need the mental energy to rework a current post to make it ‘right’)
  • A 4th of July dress or outfit for Miss Faye
  • Planning and putting up a chicken wire fence to keep the bunnies out of my garden
  • Planning Miss Faye’s 1st birthday party
  • Making a party dress for Miss Faye
  • I got an awesome dresser that I garbage picked…I need to refinish/paint it
  • A full set of curtains for a friend’s bedroom

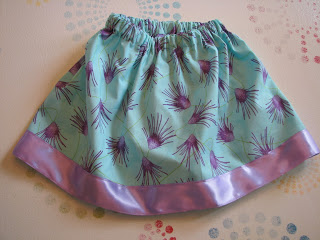
 Here is the skirt.

I used left over fabric from a birthday gift to Hugh’s Birthday Buddy. Shown in this post. I really liked it with the darker purple ribbon but I didn’t have enough so I made a quick trip to the store for this. I also added some top stitching around the waist and a matching purple tag. I also switched to using my surger.

I made this skirt a bit on the long side so that it will last longer for Miss Faye. Now, I need to come up with a top to match it…or at least sort of go with the skirt. Right now I have nothing.

Posted on

More Bloomers

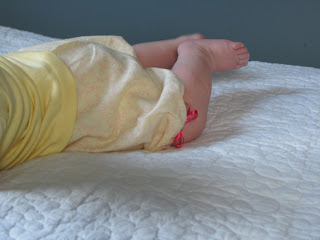
Yesterday, after I made Miss Faye the new skirt I also made her a pair of bloomers to go with this pinafore. They are the same bloomers that I made to go with this, only this time I did add the elastic to the bottom of the legs. I also added a cute little ribbon bow.

She is wearing a shirt that my mom saved from when I was a baby. 

I still need to get pictures of her in the bloomers and the pinafore but the top was in the laundry already.

I think next time I will make the bloomers a bit shorter. These are knee length and just a bit too long. I may add some butt ruffles next time as well!

I really love these because they are simple and they are roomy enough to
fit her cloth diaper. They are also easy on and off to change said
diaper.

Here is a quick pic of the fabric I picked up to make her another outfit. I just can’t decide what to make, another pinafore/bloomer set or a dress or something completely different. I have been scouring the internet looking for cute patterns. I did find one that I liked but it was much too expensive so I still have my feelers out.